Tutorial 2c - Code Modifications (Workflow + Simulation)
Contents
Tutorial 2c - Code Modifications (Workflow + Simulation)#
This tutorial is an introduction to familiarizing yourself with Git and Github workflow and terminology and making simple code modifications. Specifically, we will work through an example that modifies CTSM code related to grass phenology and test this modification for the Konza Prairie NEON Flux Tower site. Below, you will find steps to:
Check your cloned CTSM repository for any changes to date
Create a Git branch for code modifications
Make code modifications
Run CTSM with new code modifications
Save changes to your GitHub branch
[optional] Share your changes with others
Once you have completed this tutorial, you can compare the changes from the new code to the original in tutorial Day2d_CodeModification_Visualization.ipynb.

If you want to know more about Git and GitHub, here is a tutorial you can use: https://swcarpentry.github.io/git-novice/
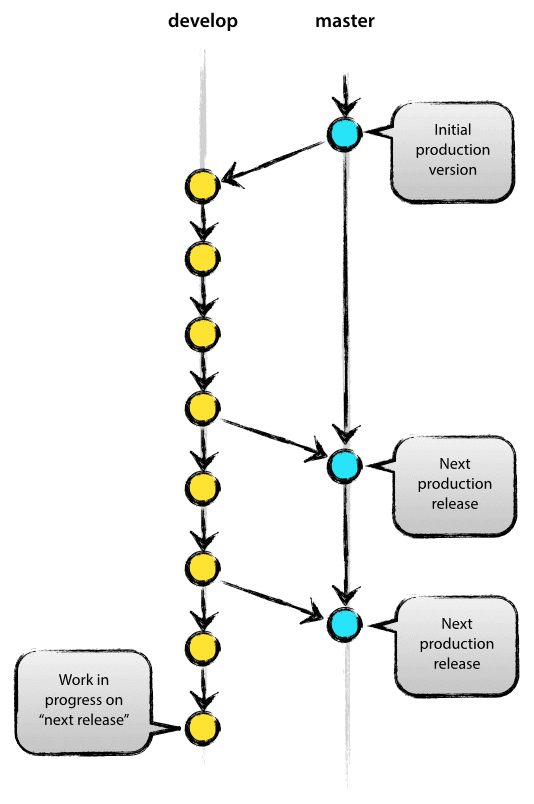
TIP: Before attempting any code modifications on your own, familiarize yourself with the suggested CTSM workflow with Git that we’ll go over here
In this tutorial, we assume you have already cloned CTSM repository during the Day0a_GitStarted.ipynb tutorial. If not, please follow the Day0a_GitStarted.ipynb to do this.
It is also recommended that you go through the Day0b_NEON_Simulation_Tutorial.ipynb tutorial and run simulations for KONZ so that you can compare the results of the code we’ll modify here with the original code.
1. Check the cloned CTSM repository#
First navigate to your cloned CTSM repository:
cd ~/CTSM/
Next, check the status of your clone on the cloud. The command below shows if you have already made any changes to your code in the cloud:
git status
On branch master
Your branch is up to date with 'origin/master'.

nothing to commit, working tree clean
You will likely see this message: “Your branch is up to date with ‘origin/master’.” Note that if you have already made changes to the model code, it will show up as the output of git status.
To check what changes you have made to the code at any point, you can use the following command:
git diff
If you have been following this tutorial consecutively, you should have a clean copy of the repository and will not see any differences.
2. Create a branch for your code modifications#
Now we will create a git branch for our code modifications. Creating a branch in GitHub allows you to make modifications and develop new features to the code while not changing the original code directly.
branch of a repository is a copy of the original, or main branch. Branches allow you to preserve the original code (the 'main' branch) while making any modifications in a copy (the new branch) and therefore can help to contain errors so that they do not get propogated into the 'main' code base. Using branches also helps to work on multiple features or bugs simultaneously while keeping a base branch that you know works.
The below line of code creates a branch for your development called phenology_change:
git checkout -b phenology_change
Switched to a new branch 'phenology_change'
git status
On branch phenology_change
nothing to commit, working tree clean
3. Make your code modifications#
Now that you have abranch of the code, you can start changing the code.
In this tutorial, we are going to change one aspect of grass phenology. In particular, we will change the threshold for the amount of rain required for leaf onset and compare the results for Konza Prairie Biological Station (KONZ).
WARNING: To compare the results from modified code with original code, make sure you have already run the original CTSM code for Konza (KONZ) or have previously completed the Day0b_NEON_Simulation_Tutorial.ipynb for the KONZ site.
To find more information about NEON’s KONZ site, please visit NEON’s website: https://www.neonscience.org/field-sites/konz
Questions:
Where is Konza Prairie Biological Station located?
Is rain necessary for leaves to green up here?
The CTSM model code is located under src directory.
3.2 Locate the CNPhenologyMod.F90 file#
To Do: Navigate to CTSM/src/biogeochem/CNPhenologyMod.F90 and double-click on the CNPhenologyMod.F90 file to open it:#
Do you only see the tutorials listed in the sidebar? You can navigate to the files listed above in the sidebar interface by following the file path. Start by clicking on the folder icon (above ‘Name’), then click on CTSM -> src -> biogeochem. From here, find and double-click on the CNPhenologyMod.F90 file.

It will open up the file under another tab:

This will open up a Fortran code, which you can read and edit.
TIP: You can also access the file with any text editor. To do this, open the file with vim, emacs or another text editor of your choice from a terminal window.
3.3 Modify the rain_threshold#
In the below exercise, we will change the rain threshold for stress deciduous vegetation, which includes C3 grasses. The rain threshold is the amount of rain required to initiate leaf onset. Reaching the rain threshold is one of several requirements for stress deciduous vegetation leaf onset. If you are interested, you can find more information about the stress deciduous phenology representation in the CLM Technical Note.
Question:
Can you find
rain_thresholdin the code? What is the current value set to? Tip: Try using a search function (e.g., cmd+f on a Mac or ctrl+f on a PC).
Answer:
The current value of rain_threshold is 20mm as specified in the line 1349 in the code:
rain_threshold = 20._r8
To Do: Change rain_threshold for leaf onset to 1mm in this file.#
Your modified code should look the same as this:
rain_threshold = 1._r8
Now that you’ve changed the value of the rain threshold, save and close this file. Note that JupyterLab automatically saves your changes at a regular interval. However, to ensure your changes are saved, go to the “File” menu (upper left) and click on “Save File”.
Questions to consider:
Will changing the rain threshold from 20 mm to 1 mm cause leaf onset to be earlier or later than the original simulation?
How might changes in leaf onset impact simulated carbon, water, and energy fluxes?
Let’s quickly check that our code modifications are reflected using git.
git diff ~/CTSM/src/biogeochem/CNPhenologyMod.F90
diff --git a/src/biogeochem/CNPhenologyMod.F90 b/src/biogeochem/CNPhenologyMod.F90
index f87a59eba..82ea12458 100644
--- a/src/biogeochem/CNPhenologyMod.F90
+++ b/src/biogeochem/CNPhenologyMod.F90
@@ -1346,7 +1346,7 @@ contains
       avg_dayspyr = get_average_days_per_year()

       ! specify rain threshold for leaf onset
-      rain_threshold = 20._r8
+      rain_threshold = 1._r8

       do fp = 1,num_soilp
          p = filter_soilp(fp)
You should see that changes you made to rain_threshold reflected in the output above.
Specifically, git will list the name of the file, the lines of code before and after your changes, and your changed code. The changes you made will be denoted with ‘-’ and ‘+’ symbols, illustrating what was deleted (‘-’) and what was added (‘+’).
4. Run a CTSM simulation using your modifications:#
In this step, you will test your modifications by running the modified code.
You can do so by either:
Using
./run_neon.pyscript. (easiest method)Following the steps for running an unsuported single point case similar to Day2a_GenericSinglePoint.ipynb.
We recommend using the run_neon.py script for any NEON flux tower simulation, as this simplifies the steps of running a NEON tower simulation and points to the NEON flux tower meteorological data that are already created. The generic single point tutorial does not use flux tower meteorological data, but instead extracts data from the global datasets that are used to run CTSM.
./run_neon.py is a user-friendly script that simplifies all the steps of running NEON tower simulations into one command.
Now, let’s run a CTSM simulation for our NEON site, KONZ, with these modifications. Note that we have changed output-root to ~/scratch/CLM-NEON-phenologychange. Creating a new output-root allows us to test the changes at several sites. We also have to specify --overwrite so that the script will run the KONZ site another time.
qcmd -- run_neon --neon-sites KONZ --output-root ~/scratch/CLM-NEON-phenologychange --overwrite
Submitting command to Slurm:
    run_neon --neon-sites KONZ --output-root /home/negins/scratch/CLM-NEON-phenologychange --overwrite

Waiting for job 1056 to start ...
Note: Your simulation has been submitted, but may take some time to download required data and run the simulation. You can check the status of your simulation using the same commands you used in the Day0b_NEON_Simulation_Tutorial.ipynb.
qstat -u ${USER}
ctsmworkshop2022.cesm.cloud:
                                                                               Req'd  Req'd   Elap
Job id               Username Queue    Name                 SessID NDS   TSK   Memory Time Use S Time
-------------------- -------- -------- -------------------- ------ ----- ----- ------ ----- - -----
1056                 negins   build    qcmd                 --         1     8     -- 60:00 R 60:00
tail ~/scratch/CLM-NEON-phenologychange/KONZ.transient/CaseStatus
2022-05-25 19:09:13: model execution starting 719
 ---------------------------------------------------
2022-05-25 19:30:51: model execution success 719
 ---------------------------------------------------
2022-05-25 19:30:51: case.run success 719
 ---------------------------------------------------
2022-05-25 19:30:52: st_archive starting 720
 ---------------------------------------------------
2022-05-25 19:30:54: st_archive success 720
 ---------------------------------------------------
Next, we’re going to have a quick look at changes in LAI and GPP from our phenology changes to make sure the changes worked as intended. After ensuring that the code modifications worked and do not have any bugs, we suggest saving your code (see section 5) and running an AD and post-AD spinup to generate a new initial conditions file.
WARNING!
We strongly recommend running a full spinup after making code modifications (see example in Day2a_GenericSinglePoint.ipynb) before evaluating new code development.
5. Save your changes to your github branch#
When you are happy with your changes, make sure you have committed these changes and submitted them to your GitHub repository.
Below, we walk you through the easiest way to do so.
First, check the status of all files. The following command will will show all the files that have been modified.
git status
On branch phenology_change
Changes not staged for commit:
  (use "git add <file>..." to update what will be committed)
  (use "git restore <file>..." to discard changes in working directory)
	modified:   CNPhenologyMod.F90

no changes added to commit (use "git add" and/or "git commit -a")
Next, add any file (or all files) to be saved.
Note that specifying a single file will add only that file. Using ‘.’ will add all files.
git add CNPhenologyMod.F90
Then, commit your changes (effectively saving them on version control) using a meaningful commit message:
git commit -m "Changing rain threshhold for leaf onset to 1mm"
[phenology_change ff59e3121] Changing rain threshhold for leaf onset to 1mm
 1 file changed, 1 insertion(+), 1 deletion(-)
Last, you can compare the original (unmodified) branch to your modified branch to see the submitted changes:
git diff --name-status origin/master phenology_change
M src/biogeochem/CNPhenologyMod.F90
The next tutorial, Day2d_CodeModification_Visualization.ipynb, guides you through visualizing the output of original simulation compared to the modified code for KONZ site. It also helps you to compare both simulations with evaluation data from the NEON flux tower.
6. [Optional] Sharing your changes with others & pushing changes back to your GitHub Repository#
Note: If you plan to contribute your code developments to CTSM, you will need to use these optional steps to share your code with CTSM model developers. If you already have a GitHub account and have a CTSM fork, start at step 6.3.
So far, we made a code change and saved it to a local branch. In reality, we usually want/need to push our changes back to GitHub so our collaborators can see, comment, or use our code modifications.
Imagine saving your progress in a video game or in a Word document on a local computer. If you use a different computer, you can not load your progress. However, if you save your video game progress or your Word document on the cloud, you can easily access it from any computer. Nowadays, video games save your progress via a profile/account and Word documents can be saved and shared through Google or Dropbox accounts.
Similarly, you need to create an account on GitHub to be able to share your changes so:
you can access your code and changes from anywhere.
you can share with collaborators.
you can contribute back to CTSM repository.
6.1. Create a GitHub account#
Visit the GitHub website and create an account if you don’t already one. You can skip step this if you already have a GitHub account.
6.2. Create a fork from CTSM repository#
You don’t have access to write directly to the main CTSM repository (that right is reserved for the CTSM main software engineers), so you need to create your own copy of the repository to save your changes. For this, you will fork the CTSM repository.
To Do: Create a fork#
You can create your own fork of the CTSM repository by using the fork button in the upper right corner of the CTSM reository page.
Login to your GitHub account.
Navigate to the original CTSM repository (escomp/CTSM).
Use the
forkbutton to create a fork of CTSM repository in your account

Your forked repository will be under your account name:
https://github.com/YOUR-USER-NAME/CTSM
For example, for the username (negin513) the forked repo is:
https://github.com/negin513/CTSM
You can make any modifications you’d like to your forked repository. Note that you only have to fork a respository once – it will always be connected to your GitHub account unless you delete it.
6.3. Pushing your changes to the outside world:#
To start, connect your forked repository to the computing system you are using. You can do so by using the following:
WARNING!
Please replace “YOUR_USER_NAME” in the code below with your own GitHub username (created in step 6.1).
git remote add YOUR_USER_NAME https://github.com:YOUR_USER_NAME/CTSM.git
Finally, push your changes to the remote repository. Note that ‘pushing’ the changes makes the changes visible to anyone who looks at your GitHub repository, including your collaborators.
git push -u YOUR_USER_NAME phenology_change
To see your changes now you can go to your fork and look for your ‘phenology_change’ branch on github.com. You will be able to see your recent changes.
6.4 Submitting a Pull Request to CTSM#
In the future, you might want your code changes to be included on the CTSM main branch. The benefits of this are that everyone who forks CTSM can see and use your code modifications. Additionally, this will ensure that you do not need to continually update and resolve conflicts when new code developments are added to code you are using. We recommend talking with CTSM scientists and software engineers early in your code development process so that we are aware of your proposed code changes and can let you know about any potential conflicting code developments that are also in progress.
To contribute your changes to the main CTSM respository, you will need to submit a GitHub Pull Request.
Creating a Pull Request (PR) is easy and is a great way to contribute scientific changes to the community code. To create a PR:
Navigate to CTSM PR page on GitHub (https://github.com/ESCOMP/CTSM/pulls)
Next, click the
New pull requestbutton on the top right corner of the page.Then, click on
compare across forkslink.Choose your base and head repository and branches.
In the
head repositorychoose your own fork.
Next, click on the
Create pull requestgreen button.In the “Open a pull request” page, confirm the forks and branches being used for the pull request. On the left you should see “base fork: ESCOMP/CTSM” and “base: master”. On the right you should see “head fork: YOUR_USER_NAME/CTSM” and “compare: MYBRANCH” (where YOUR_USER_NAME will be your git username, and MYBRANCH will be the branch you’d like brought to the main CTSM code base).
Enter a short but descriptive title for this pull request
In the comment box, give a more detailed description of this pull request
Click the green “Create pull request” button
Our scientists and software engineers will review the code and start a conversation with you about the modifications you made. Most times they will ask for clarification and modifications. If the code meets CTSM scientific and software engineering standards, they will eventually merge it with the CTSM main branch. You can see some active pull tequests on GitHub.
Resources: You can find more resources the CTSM wiki on: